30 aprile 2014

Idee per creare un soggiorno all'esterno | Ideas for an oudoor living room

Oggi vi darò qualche dritta per creare un'area esterna accogliente e vivibile come un vero e proprio soggiorno.
  1. Prima di tutto delimitate l'area attraverso la pavimentazione: creando una pedana rialzata in legno, oppure differenziando la pavimentazione rispetto alle zone di transito, oppure mettendo un tappeto o una stuoia per esterni (prossimamente farò un post dedicato ai tappeti per esterni con le marche e i modelli più interessanti).
  2. Quindi create intimità attorno alla zona con l'aggiunta di vegetazione: aiuole o vasi con bambù, fiori, piante. Fate attenzione alla scelta delle specie, secondo l'esposizione solare dell'area (soleggiata, ombreggiata o semi-ombreggiata).
  3. Potete anche proteggere l'area con un pergolato, un gazebo, una tenda da sole o un ombrellone: valutate se è necessaria una protezione dal sole, dalla pioggia o da entrambi, a seconda del clima della vostra zona e dell'uso che vorrete fare del soggiorno esterno.
  4. Quindi dedicatevi agli arredi: servono sedute e tavolini. Le sedute possono essere divanetti, panche con cuscini, poltrone o cuscini da pavimento. Se abitate in una località piovosa, meglio scegliere il tessuto dei cuscini idrorepellente così non dovrete continuamente riporli all'asciutto.
  5. Infine pensate all'illuminazione: potete mettere delle lanterne per illuminare solo con candele e creare un'atmosfera elegante e romantica; oppure potreste appendere al gazebo/pergolato una catena di lampade ed ottenere un effetto più giocoso; infine potreste utilizzare arredi luminosi che creano un'atmosfera surreale.
Nelle immagini trovate dei progetti da cui prendere spunto: buon lavoro! E se non riuscite da soli... scrivetemi o contattatemi su Facebook.
xxx
Today I'll tell you a few tips to create a cozy and livable outdoor area, like a real living room.
  1. First of all you should border the area with flooring: creating a raised wood platform, or by differentiating the flooring from the one of transit zones, or putting an outdoor carpet or mat (soon I'll post a section dedicated to outdoor rugs with interesting brands and models).
  2. Then you have to create intimacy around the area with the addition of vegetation: bamboo beds or pots, flowers, plants. Pay attention to the choice of types, according to solar exposure (sunny, shady or semi-shady).
  3. You can also protect the area with pergola, gazebo, awning or umbrella: evaluate if you need a protection from sun, rain, or both, depending on the climate in your area and on the use that you'd like to do of this outdoor living room.
  4. Then chose the furniture: you need seats and tables. The seats can be sofas, benches with cushions, chairs or floor cushions. If you live in a rainy location, choose the best water-repellent fabric cushions (so you won't have to continually put them dry).
  5. Finally, think about the lighting: you can put lanterns to enlighten only with candles and to create an elegant and romantic atmosphere; or you could hang on the gazebo/arbor a chain of lamps and achieve a more playful effect; finally, you could use bright furnishings that create a surreal atmosphere.
In the pictures you'll find some idea to be inspired by: good work! And if you cannot do it yourself... write me or contact me on Facebook.


28 aprile 2014

Novità dal Salone del Mobile 2014 | News from Salone del Mobile 2014

Si è concluso da poco il Salone del Mobile di Milano (dall'8 al 13 aprile 2014) e vi propongo qui una selezione di novità che a mio parere sono interessanti.
[qui trovate le Anteprime del Salone del Mobile 2015 di Domoitalia!]
xxx
Recently there was the Milan Furniture Fair (from 8th to 13th April 2014), and I propose here a selection of novelty which in my opinion are interesting.
[here you'll find 2015 Furniture Fair Preview from Domoitalia!]


2 aprile 2014

Culle sospese per sogni oscillanti | Suspended cots for swinging dreams

E' arrivato il caldo primaverile e si cominciano ad abbandonare i cappotti e i piumini. Forse per questo si notano di più le pance delle mamme in dolce attesa!
E allora vi presento alcune bellissime culle sospese, perché i vostri cuccioli possano sentirsi dondolati come quando erano ancora nella pancia...
Trovate i link dei produttori nella didascalia delle immagini.
La prima, quella ovoidale, è la mia preferita ma purtroppo pare non sia più in vendita.
xxx
The Springtime's warm has arrived and we can leave coats and jackets. Maybe that's why we can notice much more expectant mothers' bellies!
So I'm going to show you some beautiful suspended cots, for babies feeling shimmy like when they were still in the belly...
You'll find the producers' links in the pictures' captions.
The first, the ovoid one, is my favourite but unfortunately it's no longer for sale.


18 marzo 2014

La casa di Patrick Dempsey a Malibu | Patrick Dempsey's Malibu House


Patrick Dempsey (famoso per aver interpretato il ruolo del Dr. Shepherd in Grey's Anatomy) e la moglie Jillian (scultrice) hanno acquistato a Malibu una delle prime case progettate dall'archistar Frank O. Gehry.
La casa fu progettata nel 1968 come residenza e atelier per l'artista Ron Davis. Tuttavia quando la famiglia Dempsey l'acquistò era già stata ristrutturata dai successivi proprietari, che per il parco si avvalsero del landscape designer Scott Shrader.
Per l'arredamento i coniugi Dempsey si sono rivolti alla decoratrice Estee Stanley, che aveva arredato anche la loro precedente abitazione. 
Tonalità naturali, mobili e oggetti d'antiquariato e mobili realizzati su misura caratterizzano gli interni.
All'ingresso, costituito da un ampio pannello vetrato pivotante, c'è una scultura di tubi fluorescenti di Rober Irwin, artista californiano, mentre nell'atrio fa capolino un daybed vintage di Jacques Adnet.
Nel soggiorno due chaise longue verdi di Blackman Cruz fiancheggiano un antico specchio e un tavolino su cui poggia una scultura di Jillian Dempsey.
Nell'area pranzo, con sedie di Lucca Antiques e un tavolo realizzato su misura da Teak Nichols Design, sono esposte alcune foto di Melvin Sokolshy.
xxx
Patrick Dempsey (famous for playing the role of Dr. Shepherd of Grey's Anatomy) and his wife Jillian (sculptor) bought one of Frank O. Gehry's first houses in Malibu.
The house was designed in 1968 as a residence and studio for the artist Ron Davis. However, when the family Dempsey bought it, the house had already been restored by other owners, with the help of landscape designer Scott Shrader for the garden.
Mr and Mrs Dempsey call on decorator Estee Stanley for the interior design, because she had already furnished their previous home.
Natural shades, vintage furniture and antiques and custom-made furniture characterize the interiors.
At the entrance, made by a large pivoting glass panel, there's a Robert Irwin's sculpture made with fluorescent tubes while in the atrium peeps a vintage daybed by Jacques Adnet.
In the living room two green chaise longue by Blackman Cruz flank an antique mirror and a small table on which rests a sculpture of Jillian Dempsey.
In the dining room, with chairs of Lucca Antiques and a custom-made table from Teak Nichols Design, some photos made by Melvin Sokolsky are hanging on the wall.


5 marzo 2014

Un'appartamento spaziale! | A spatial apartment!

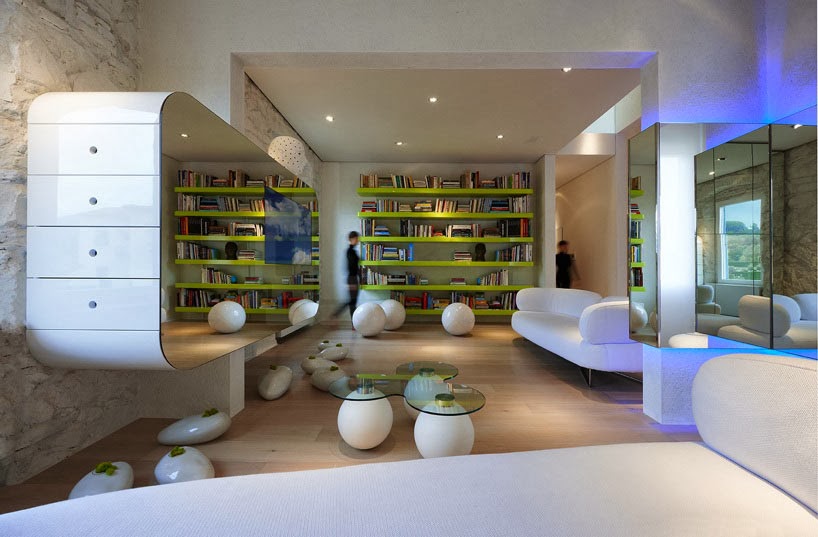
Superfici lucide, specchi retroilluminati da led colorati, curve e mobili realizzati su disegno sono la firma dell'architetto Simone Micheli. I suoi progetti hanno sempre un'impronta futuristica e fantascientifica, che richiama alla memoria fotogrammi di "2001: Odissea nello spazio" o il design degli anni Sessanta di Archizoom e Verner Panton.
Shiny surfaces, mirrors with back colored LED lights, curves and custom-designed furniture are the signature of the architect Simone Micheli. His projects always have a futuristic and sci-fi impression, which reminds me frames of "2001: A Space Odyssey" or the Sixties design of Archizoom and Verner Panton. 

7 febbraio 2014

Una casa/studio a Berlino | A home/office in Berlin

Un padiglione di ferro e vetro rimasto incompiuto è stato sistemato dall'architetto Anja Thede per farne la propria abitazione/studio. Il padiglione si trova in un complesso edilizio di Berlino Est, un tempo adibito a prigione ed ora riconvertito in complesso residenziale e commerciale.
Il locale ha superficie di 60 metri quadri, un'altezza di 4,80 metri e uno stile indiscutibilmente industriale: struttura del soppalco e scala in metallo, soffitto in cemento a vista, pavimento in asfalto (Frank O. Gehry fa scuola).
Dato che la casa sarebbe stata utilizzata anche come studio, per isolarsi dalla giornata lavorativa una volta rimasta sola con il suo labrador, Anja ha ideato il Cargo Box 002. Si tratta di un cubo in legno compensato all'interno del loft che funge da nicchia confortevole. Tale struttura può essere aperta o chiusa rispondendo a varie funzioni che vanno da soggiorno, a camera ospiti e anche scaffale. Dentro c'è anche la TV.
Idea geniale, eh?
xxx
An unfinished pavilion of glass and iron has been renovated by architect Anja Thede to make her home and office. The pavilion is located in a building complex of East Berlin, once used as a prison and now converted into a residential and commercial complex. 
The apartment is ​​60 square meters area, 4.80 meters height and has got an undeniably industrial style: metal structure for staircase and loft, exposed concrete ceiling, asphalt floor (Frank O. Gehry teachs). 
To create a place to insulate herself (and her labrador) from the working day, she invented Cargo Box 002. It's a plywood cube inside the apartment that serves as a comfortable nook. This structure can be opened or closed in response to various functions ranging from living room to guest room and also shelf. There's also TV inside it.
Brilliant idea, huh?


27 gennaio 2014

La stanza delle caramelle a Melbourne | Melbourne's Candy Room

Oggi vi vorrei far conoscere questo sorprendente negozio di caramelle, The Candy Room, progettato da Red Design Group per Sweet Enough (un importatore di caramelle senza zucchero), che si trova a Melbourne e che forse non vedrete mai "dal vivo" (io ad esempio avrei una cinquantina di altre mete da visitare prima dell'Australia...). (...)
xxx
Today I would like to show you this amazing candy store, The Candy Room, designed by Red Design Group for Sweet Enough (an importer of sugar-free candy), which is located in Melbourne and maybe you will never see "live" (for example, I have 50 other places to visit before Australia...). (...)


24 gennaio 2014

Un muro per sognare... | A wall to dream...

Come promesso, approfondisco l'argomento camerette (trattato nell'ultimo post) illustrandovi alcune tra le infinite possibilità decorative per le pareti.
Dopo aver dipinto le pareti di uno o più colori scelti nella palette, avete essenzialmente tre possibilità:
  1. Utilizzare pitture di diversi colori per creare motivi geometrici (anche con l'aiuto di stencils) sulle pareti: come strisce (foto 15), pois (foto 12 e 13), quadretti (foto 16), stelle (foto 11) o parti con pittura-effetto-lavagna (foto 17).
  2. utilizzare degli stickers per la decorazione (come nelle foto 5, 7, 8, 9 e 10) o la carta da parati (foto 4).
  3. dipingere dei decori a piacere direttamente sul muro (foto da 1, 2, 3 e 6).
Il vantaggio degli stickers è che basta solo un minimo di progetto e un po' di accortezza nel momento dell'incollaggio: non c'è bisogno di essere degli artisti. Lo svantaggio è che dovete scegliere tra le decorazioni offerte dal mercato e non sarete gli unici ad averle.
Per dipingere le decorazioni sul muro invece dovreste avere un minimo di manualità e fantasia (oppure potete chiamare me...) ma il risultato sarà originalissimo e non avrete limiti!
xxx
As I promised, I'll deepen the topic "kids'bedrooms" (discussed in the last post) showing you some of the endless decorative options for walls.
After painting the walls of one or more colors from the selected palette, you essentially have 3 options:
  1. Use different colors of paint to create geometric patterns (also with the help of stencils) on the walls: stripes (photo 15), dots (photos 12 and 13), squares (photo 16), stars (photo 11) or parts of wall painted with chalkboard paint (photo 17).
  2. Decorate with stickers (as in pictures 5, 7, 8, 9 and 10) or wallpaper (photo 4).
  3. Paint a decoration directly on the wall (photo 1, 2, 3 and 6).
The advantage of stickers is that you just need a minimum of design and a little carefullness when sticking: you don't need to be an artist. The disadvantage is that you have to choose among the decorations offered by the market and you will not be the only ones to have them.
To paint the decorations on the wall instead you should have a minimum of dexterity and imagination (or you can call me...) but the result will be original and you will not have limits!

1 from Stencil Barcelona